Patient Profile | Demographics & Registration
The patient’s profile can be used to register your patients and store important demographic and billing information.
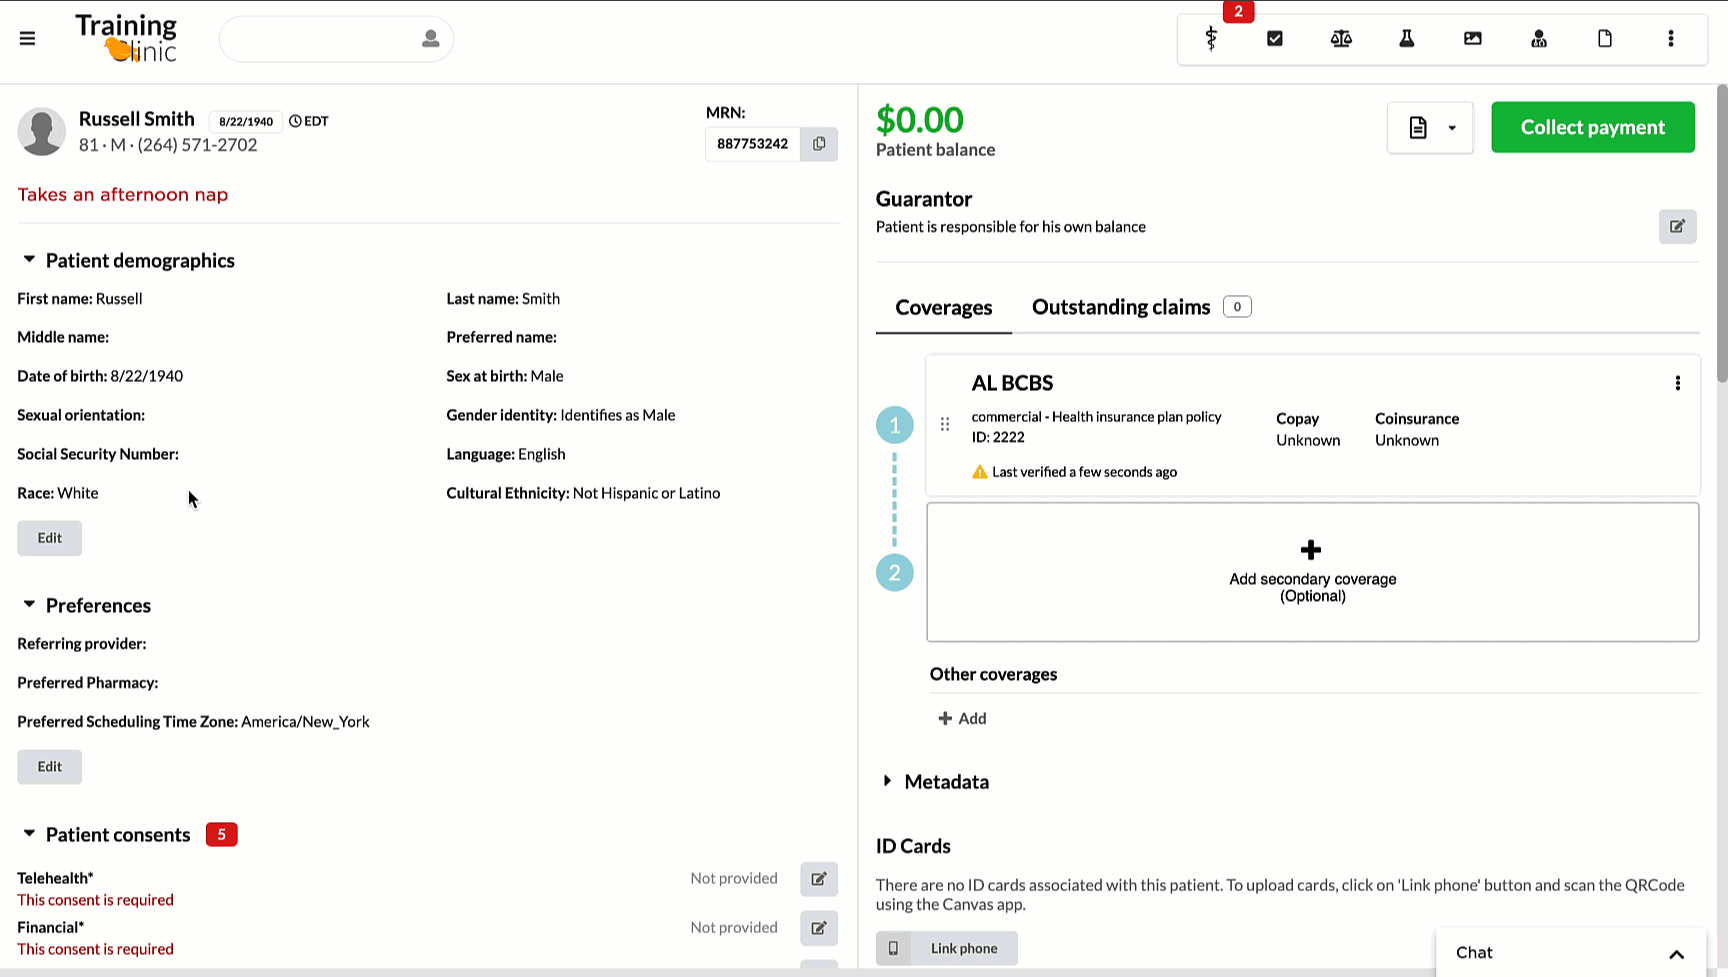
Patient Banner #
After creating a new profile, key patient identifiers are displayed in the top left corner of the patient’s profile and chart. The banner pulls first and last name, with preferred name in parentheses, DOB, patient’s preferred timezone, age, sex at birth, and phone number from the patient demographics. Edits can be made by following the instructions below. The patient’s photo can be added using the Canvas Remote iOS app, which can be downloaded from the app store.
Use the Administrative Caption to communicate reminders/notes within the office related to insurance, copay, payments, and forms. It is visible within the profile, the detailed view of the appointment card on the schedule, the patient search when creating new appointments, and on the print view of the schedule.
The Canvas generated MRN is available in the top navigation menu, with a button to quickly copy it. The banner will also display badges that indicate a patient’s status of inactive or deceased, or both.
Patient Demographics #
Demographics #
The patient demographics section allows you to capture additional fields when creating a new profile. You must click Edit to update the fields and Submit to save. If you do not want to save your changes you can click Cancel instead. All fields marked with a red asterisk are required in order to save.
Active Status #
The patient’s status (Active vs Inactive) can be managed using the checkbox at the top. After submitting an updated form with an unchecked box, you will see an Inactive badge added to the patient’s banner.
Deceased Workflow #
Clicking the deceased checkbox in the top right will initiate an automated workflow that cancels future appointments, removes follow up appointment requests, and marks contact information as unverifed in order to block outgoing messages. After checking the box, a modal will ask you to enter date of death, cause of death, and comments, all of which are option. After clicking Mark as Deceased, those additional fields will be viewable and editable within the demographics section.
Preferences #
You can add the patient’s primary care provider, referring provider, and time zone under the patient’s preferences.
Providers #
The primary care provider is a freetext field used to capture the information; however, it is not leveraged in any workflows. The referring provider is also freetext. It may be pulled into the claim depending on your settings.
Time Zone #
Preferred Scheduling Time Zone is useful to support national offerings that span multiple time zones. If added, the patient’s timezone will be visible when scheduling appointments and available slots will be presented in the patient’s preferred time. [Time Zones] must be enabled in your settings.
Preferred Pharmacies #
Adding a preferred pharmacy in the profile will drive prescribing workflows. The pharmacy added will default in new prescriptions. We use a directory of pharmacies provided by Surescripts. You can search by name, address, store number, or phone number. The type of pharmacy is shown in the search results and added as a badge once added.
If the patient uses multiple pharmacies (let’s say brick & mortar and mail-order), you can add multiple preferred pharmacies to their profile. You must set a default to drive the behavior noted above. The additional pharmacies will be available as quickpicks within the pharmacy dropdown in the Prescribe Commands.
Patient Consents #
After Patient Consents have been configured , they can be added either through the Profile or in Data Integration. After being added, the Profile should be used to track and manage existing consents.
Consents marked as mandatory will always present on the profile, whether or not they have been collected. A red badge is used to indicate outstanding consents that need to be collected and/or updated with the necessary documentation.
Adding a Consent #
On the profile page, click the edit button, and complete the form to capture the state, effective date, and expiration date of the consent. The default expiration date will populate based on how the consent was configured. The options are one year, the end of the calendar year, or never. You can also override the default by selecting custom date from the dropdown and then adding a specific date. Rejecting the consent which then surface an additional field to capture the reason. Click Done to save.
If documentation of the consent is required (a signature on file is necessary verse only needing verbal consent), a red warning, “Document required”, will display . You must process the document and link it through Data Integration. Once linked, you can click on the link, View Document, to see the attached PDF. If an updated document is linked to the same consent with a later effective date, the profile will link to the newest version. Documents with earlier effective dates will still be available under the Admin Documents in the chart.
Removing a Consent #
You can remove a consent by clicking the edit button on the consent and choosing Clear. Doing so will permanently remove the consent record. If a document was associated with the consent, it will not be deleted. It will still be accessible in the Admin Documents section of the chart.
Care Team #
Care teams roles must be configured in your admin settings by your super users. You can then designate team members as their assigned roles in the patient’s profile. Click add to select a team member and assign a role.
You can update the role as needed by clicking the edit button (pen and paper icon). From here, you can change the team member, change the role, or completely delete the listing.
An inactive label will be added next to staff that have been marked as inactive in the admin settings.
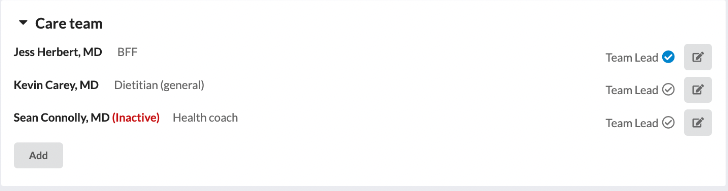
Care team membership is visible within the patient summary in the chart.
![]()
Care Team Lead #
Designating a team lead will impact the following workflows:
Panel Filters
- Panel Inpatient stays will display care team Lead
Messaging
- Incoming messages from patient app will be sent to the care team lead.
- When a care team lead has not been assigned AND no prior messages have been sent to the patient, incoming patient messages will be assigned to Canvas Bot.
- When a care team lead has not been assigned BUT a staff member has previously messaged the patient, incoming patient messages will be assigned to the staff member who last messaged the patient.
- & will render the care team leads credentialed name and signature in message/letter templates.
- Patient app emails “from name” will display the care team lead’s location name.
Printed Documents
- Care team lead’s primary location contact information will be used.
- Lab orders will include the care team lead’s primary location ordering site number and contact info.
- Full Chart PDF printout will display care team lead.
- Vitals printout will display care team Lead name.
- Print specimen label displays care team Lead in ORDERED BY field.
Populations
- You can filter by care team lead.
- Iintervention messages include care team lead’s name or intervention’s author if care lead is none.
Data Export
- The following fields will return care team cead name:
- Continuity of Care > author
- Continuity of Care > provider
- Referral > author
- Referral > provider
Data Integration
- Reviewer defaults to the patient’s care team lead
Health Gorilla
- Ordering provider fallbacks to care team lead, if original provider does not have a valid NPI
- Reviewer falls back to Care Team Lead, if NPI given by Health Gorilla cannot be found
Medications
- ChangeRequest search will search on care team lead
- PrescriptionAlert search will search on care team lead
- Refill requests will search by care team lead
Google-Delivered Reports
- dump_demografics (Patient List Google Delivered Report) will rename PCP First Name and PCP First Name to Care Team Lead
Addresses #
Click the grey Add button to open the address form and choose whether you want to add an individual or facility address.
Individual Addresses #
When adding an individual address, you must select use (Home, Work Temp, Old) and type (Postal, Physical, Both) Patients MUST have at least one address set as either postal or both and as home to receive patient statements or successfully process electronic lab and prescription orders. It is best practice for each patient to have an active address. Designating the type as old will prevent any actions that require an address, such as patient statements, electronic lab orders, or electronic prescriptions.
Facilty Addresses #
Facilities must be configured in your admin settings following these steps. Once configured, you can add a facility using the drop down. The facility will have a default address. From there, you can add a specfic room number.
Phone numbers #
You can add multiple phones numbers with free text descriptions to denote their use. Use the preferred toggle to indicate the preferred number and the This phone can receive text messages toggle to indicate whether the number should receive outbound commmunication via text. The patient must confirm the number to receive Canvas’s default messaging.
Emails #
You can add multiple emails with free text descriptions to denote their use. Use the preferred toggle to indicate the preferred email. The patient must confirm the email to receive Canvas’s default messaging.
Contacts #
You can add contacts, with addiitonal data points per patient, to ensure all relevant individuals are included in the patient profile. When adding or updating a contact, the name, relationship, phone number, email, and comments fields are all free text to capture the necessary information. These values will appear next to the contact’s name for immediate visibility to all data points. Addtiionally, you can select from pre-populated Category options from the dropdown menu, each contact can have one or multiple categories selected. Categories can be configured in your admin settings following these steps and once added, each categoriy value will appear as a colored label next to the contact name. The contact categories of Power of attorney, authorized for release of information, and emergency contact are default categories that will automatically appear in the dropdown for all contacts.
If a contact has been created with the category of Power of attorney, this contact will appear as a dropdown option in the Data Integration workflow if the corresponding patient and Power of Attorney document type are inputted. If no contact appears, you must first add the contact to the corresponding patient profile with the Power of attorney contact category in order to see the contact in the Data Integration contact workflow. Once the Power of Attorney document has been submitted with a contact, the document can be viewed from the corresponing contact in the patient profile.
All contact details can be updated or the contact can be removed at any time.