Customer Authentication
Introduction #
- Canvas is an OAuth 2.0 authorization server.
- This page contains information about how you can create third-party applications within your Canvas EHR instance and use those applications to access the FHIR API.
- Canvas supports most OAuth flows, but this document will focus on two of the most used:
- Client Credentials: Mostly used for Machine-to-Machine authentication (e.g., CLIs, Daemons).
- Authorization Code: Usually used for web/native applications since it requires a user to log in to the system.
Registering a third-party application on Canvas #
- Registering a third-party application is always the first step.
- In order to do so, you’ll need to:
Go to
{YOUR_CANVAS_EHR_INSTANCE}/auth/applications/where you’ll see the following page:
Once you click the link on that page, you’ll see the following:
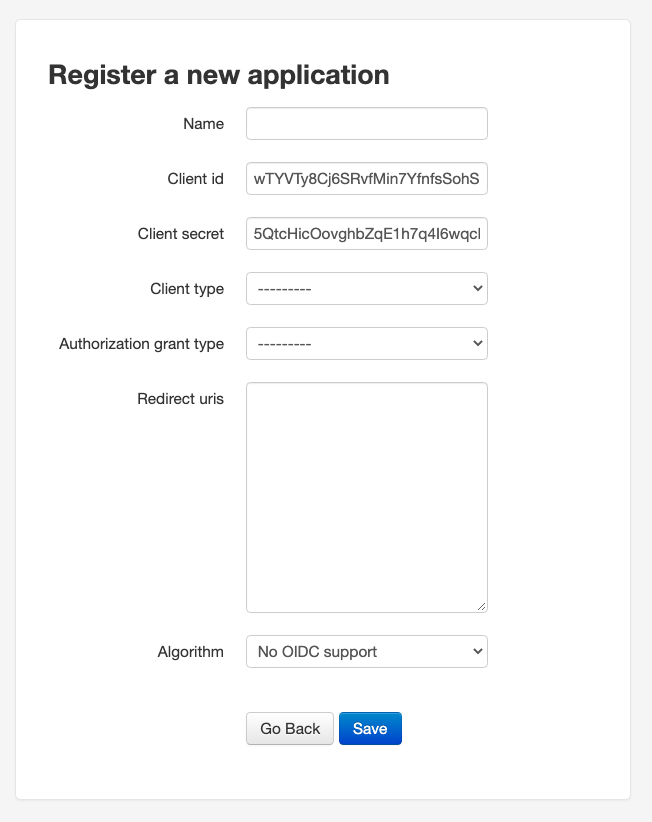
- You’ll need to set a name for the app, set the
Client typetoConfidential, choose one of theAuthorization grant types, and set theRedirect URIsif needed. Leave theAlgorithmatNo OIDC supportfor now. Here’s how it should look if you created a new “Test Application” with the
client-credentialsgrant type:
- That’s it. Take note of your
Client IDandClient Secret, and proceed to the section related to theAuthorization Grant Typeyou chose.
Client Credentials #
- The Client Credentials flow assumes that everyone involved is capable of securely storing the
Client IDandClient Secret. - In order to get a token, you just need to:
curl --request POST '{YOUR_CANVAS_EHR_INSTANCE}/auth/token/' \
--header 'Content-Type: application/x-www-form-urlencoded' \
--data-urlencode 'grant_type=client_credentials' \
--data-urlencode 'client_id={YOUR_CLIENT_ID}' \
--data-urlencode 'client_secret={YOUR_CLIENT_SECRET}'
and you’ll get back a JSON which will contain an access_token that’ll be valid for 10 hours.
Authorization Code #
The Authorization Code flow ensures a user of the Canvas EHR explicitly approves the token request. It’s typically used by web/mobile applications that act on behalf of a specific user (staff or patient).
The access token obtained through this flow carries the identity of the user who authorized it. This means:
- FHIR API calls are scoped to that user’s permissions.
- SimpleAPI plugin endpoints receive the user as the event actor, allowing plugins to identify which user is making the request and enforce access controls.
Basic Steps #
- The application opens a browser to the Canvas authorization endpoint.
- The logged-in user sees the authorization prompt and approves the request.
- The user is redirected back to the
redirect_uriwith an authorization code in the query string. - The application exchanges the authorization code for an access token and refresh token.
Step 1: Redirect the User to Authorize #
Open the following URL in the user’s browser:
{YOUR_CANVAS_EHR_INSTANCE}/auth/authorize/?response_type=code&client_id={CLIENT_ID}&scope={SCOPES}&redirect_uri={REDIRECT_URI}&launch={LAUNCH_CONTEXT}
Important notes:
launchparameter (required for staff users): Staff users must include alaunchparameter containing a base64-encoded JSON object with context. Without this parameter, the authorization will be denied witherror=access_denied.# Encode a launch context with a patient key echo -n '{"patient":"PATIENT_KEY_HERE"}' | base64 # Result: eyJwYXRpZW50IjoiUEFUSUVOVF9LRVlfSEVSRSJ9 # Or with an empty patient (if no specific patient context is needed) echo -n '{"patient":""}' | base64 # Result: eyJwYXRpZW50IjoiIn0=URL-encode special characters in scopes: Scopes like
user/*.readcontain/which must be encoded as%2Fin the URL. For example:scope=user%2F*.read%20user%2F*.writeAuthorization codes expire quickly: The code returned in the redirect is valid for approximately 60 seconds. Exchange it for tokens immediately.
Example authorize URL:
{YOUR_CANVAS_EHR_INSTANCE}/auth/authorize/?response_type=code&client_id={CLIENT_ID}&scope=user%2F*.read%20user%2F*.write&redirect_uri=https://your-app.com/callback&launch=eyJwYXRpZW50IjoiIn0=
After the user clicks Authorize, they are redirected to your redirect_uri with a code parameter:
https://your-app.com/callback?code=AUTHORIZATION_CODE
Step 2: Exchange the Code for Tokens #
curl --request POST '{YOUR_CANVAS_EHR_INSTANCE}/auth/token/' \
--header 'Content-Type: application/x-www-form-urlencoded' \
--data-urlencode 'grant_type=authorization_code' \
--data-urlencode 'client_id={CLIENT_ID}' \
--data-urlencode 'client_secret={CLIENT_SECRET}' \
--data-urlencode 'redirect_uri={REDIRECT_URI}' \
--data-urlencode 'code={CODE_FROM_PREVIOUS_STEP}'
Response:
{
  "access_token": "AN_ACCESS_TOKEN",
  "expires_in": 36000,
  "token_type": "Bearer",
  "scope": "user/*.read user/*.write",
  "refresh_token": "A_REFRESH_TOKEN",
  "patient": ""
}
access_token: Valid for 10 hours (36000 seconds). Use this as aBearertoken in API requests.refresh_token: Non-expiring but single-use. Each time you refresh, you receive a new refresh token — store it to maintain long-term access.
Step 3: Use the Token #
Use the access token as a Bearer token in the Authorization header:
# FHIR API example
curl --request GET '{FUMAGE_BASE_URL}/Patient' \
--header 'Authorization: Bearer {ACCESS_TOKEN}'

# SimpleAPI plugin endpoint example
curl --request GET '{YOUR_CANVAS_EHR_INSTANCE}/plugin-io/api/{plugin_name}/{endpoint}' \
--header 'Authorization: Bearer {ACCESS_TOKEN}'
When a SimpleAPI plugin receives a request with a Bearer token, Canvas validates the token, identifies the user, and sets them as the event actor. The plugin can then use self.event.actor to determine which user is making the request.
Step 4: Refresh the Token #
Access tokens expire after 10 hours. Use the refresh token to get a new access token without requiring the user to re-authorize:
curl --request POST '{YOUR_CANVAS_EHR_INSTANCE}/auth/token/' \
--header 'Content-Type: application/x-www-form-urlencoded' \
--data-urlencode 'grant_type=refresh_token' \
--data-urlencode 'client_id={CLIENT_ID}' \
--data-urlencode 'client_secret={CLIENT_SECRET}' \
--data-urlencode 'refresh_token={REFRESH_TOKEN}' \
--data-urlencode 'scope={SCOPES}'
Note: The scope parameter must match the scopes from the original authorization (or be a subset). If omitted, Canvas will attempt to use the application’s default allowed scopes, but this may fail with invalid_scope if the defaults don’t match the original grant.
This returns a new access_token and a new refresh_token. The previous refresh token is consumed and cannot be reused. Store the new refresh token for the next refresh cycle.
Recommended Pattern for External Applications #
For applications that need to make API calls on behalf of specific Canvas users (e.g., a provider portal calling plugin endpoints):
- One-time setup per user: Each user authorizes the app via the browser flow. Store the refresh token per user in your backend.
- Ongoing access: Before making API calls, check if the access token is still valid. If expired, use the stored refresh token to get a new one.
- Token storage: Access tokens last 10 hours. Refresh tokens are non-expiring but single-use — always store the latest one returned from a refresh.
Scopes #
Scopes control which parts of the API the token can access.
- Client Credentials Flow: Scopes are optional. If omitted, the token is issued with the OAuth application’s configured allowed scopes.
- Authorization Code Flow: Scopes are required and must be passed in the authorize URL.
Canvas implements SMART on FHIR scopes.
Scope syntax #
Most scopes have the form <context>/<resource>.<permission>:
<context>—user/(staff member; mirrors EHR permissions),patient/(limited to the launch-context patient), orsystem/(machine-to-machine, used with Client Credentials).<resource>— a FHIR resource (e.g.,Patient) or*for any supported resource.<permission>—read,write, or*(v1 / legacy), orc(create),r(read),u(update),s(search) (v2 / granular). v2 letters can be combined, e.g.,Patient.crus.
Separate multiple scopes with spaces, e.g., user/Patient.read user/Observation.read. URL-encode / as %2F and spaces as %20.
Common examples:
| Scope | Description |
|---|---|
user/*.read | Read access to all resources |
user/*.write | Write access to all resources |
user/*.* | Full access to all resources |
user/Patient.read | Read Patient resources only |
Launch and OpenID scopes #
| Scope | Description |
|---|---|
launch | Allows external app launches |
launch/patient | Allows patient context |
openid | OpenID Connect scope |
fhirUser | Returns the authenticated user’s FHIR identity |
offline_access | Requests a refresh token |
Resources by context #
Examples: user/*.read, system/Patient.crus, patient/Appointment.write.
user/ — most clinical resources support read, write, *, and v2 c r u s. Read-only: Coverage, MedicationDispense, Questionnaire, RelatedPerson, ServiceRequest, Specimen. Note supports read and write only (no *). Resources: *, AllergyIntolerance, CarePlan, CareTeam, Condition, Coverage, DetectedIssue, Device, DiagnosticReport, DocumentReference, Encounter, Goal, Immunization, Location, Medication, MedicationDispense, MedicationRequest, Note, Observation, Organization, Patient, Practitioner, PractitionerRole, Procedure, Provenance, Questionnaire, QuestionnaireResponse, RelatedPerson, ServiceRequest, Specimen.
system/ — same set as user/ plus Task (full access). Read-only resources match user/. system/Plugins.* grants full access to plugin install/list/management endpoints.
patient/ — restricted to the launch-context patient. Writable: Appointment, Communication, Consent, Coverage, Media, MedicationStatement, Patient, PaymentNotice, QuestionnaireResponse. All others read-only. Additional read-only resources beyond the user/system list: Appointment, Communication, Consent, Media, MedicationStatement, PaymentNotice, Schedule, Slot.
Operation scopes #
Some FHIR operations require a dedicated scope in addition to the resource scope. Available under both user/ and system/:
| Scope suffix | Operation |
|---|---|
Claim.add-activity-log-item | Add an activity log entry to a Claim |
DiagnosticReport.create-lab-report | Create a lab report |
Practitioner.send-reset-password-email | Send a password-reset email to a practitioner |
Additional reading #
- Authentication Best Practices
- Event Actor — how plugins identify the authenticated user