Quickstart
Introduction #
The Canvas Workflow Kit is a Software Development Kit (SDK) that makes it possible to extend the functionality of a Canvas instance. By providing a built-in command-line interface, skeleton code and test commands, developers can use the the SDK to create custom Protocols.
Installation #
The SDK can either be downloaded directly from PyPI or can be installed using the Python Package Manager pip. Python 3.8 or above is required.
If you are new to Python, it is recommended to install packages used for development into a Python Virtual Environment rather than your system-wide installation. Instructions for setting up and activating a Virtual Environment can be found here.
Once your virtual environment is set up and activated, open a terminal and type the following command to install the SDK:
(env) $ pip install canvas-workflow-kit
Once the installation is complete, the canvas-cli command will automatically be available in the terminal. You can test this by using the which command:
(env) $ which canvas-cli
You should see the output location like so (the directory structure will differ based on your Python installation):
(env) $ which canvas-cli
/Users/{username}/Environments/env/bin/canvas-cli
Initial Setup #
Now it’s time to set up your local environment to be able to interact with your Canvas development instance. Run the following command in the terminal:
(env) $ canvas-cli create-default-settings
This will create a .canvas folder in your home directory that contains a file named config.ini.
Open and edit the ~/.canvas/config.ini file in your editor of choice, and add the url of your canvas instance, as well as your Canvas API key.
If you are working on a Canvas preview instance, your Canvas API key is the Bearer Token on your dashboard page. If you are on a Canvas-created dev, staging or production instance, you will need to request your API token from your Canvas Implementation Manager.
After adding your url and api-key data, your config.ini file should look something like this:
[canvas_cli]
url=https://yourcanvasinstance.canvasmedical.com/
api-key=abcdef123ccaef41d4381afdd86562de8accc999
Finally, create a directory in the location of your choice to store your project. For the purposes of this guide, we have created a directory called canvas_protocols to store our code:
(env) $ mkdir canvas_protocols
(env) $ cd canvas_protocols
(env) $ pwd
/Users/{username}/Projects/canvas_protocols
Fetching Patient Data #
When using the Canvas Workflow Kit, it helps to have patient data to develop and test against. The SDK allows for patient data to be fetched from a Canvas instance and populated in your project’s workspace in .json format.
Create a directory named patients within your project directory (the one that we named canvas_protocols above:
(env) $ pwd
/Users/{username}/Projects/canvas_protocols
(env) $ mkdir patients
In order to retrieve patient data for your project, you will need to find the key for each patient record that will be fetched. For the purposes of this tutorial, we recommend starting with 2 patient records (you can always retrieve more later). To find a patient’s key:
- Using a browser, log in to your Canvas instance.
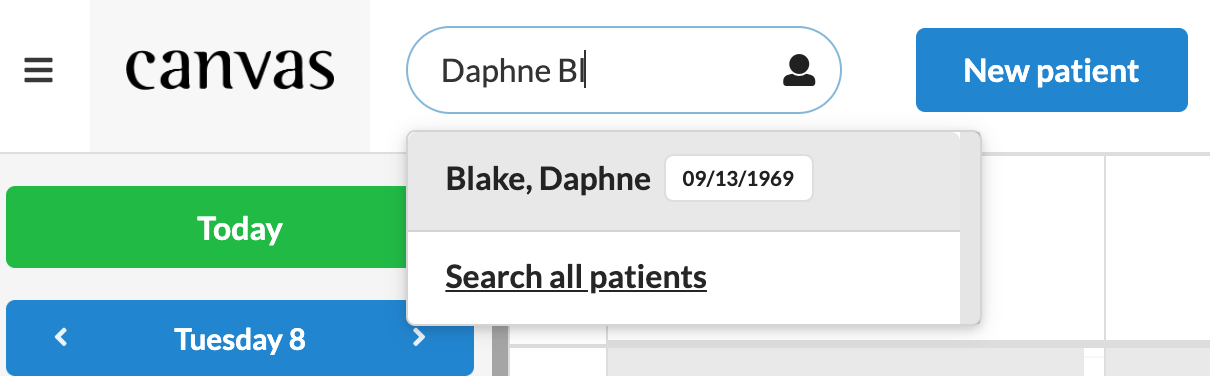
Use the Patient Search box to find an existing patient record, or create a new patient with with the New Patient button:
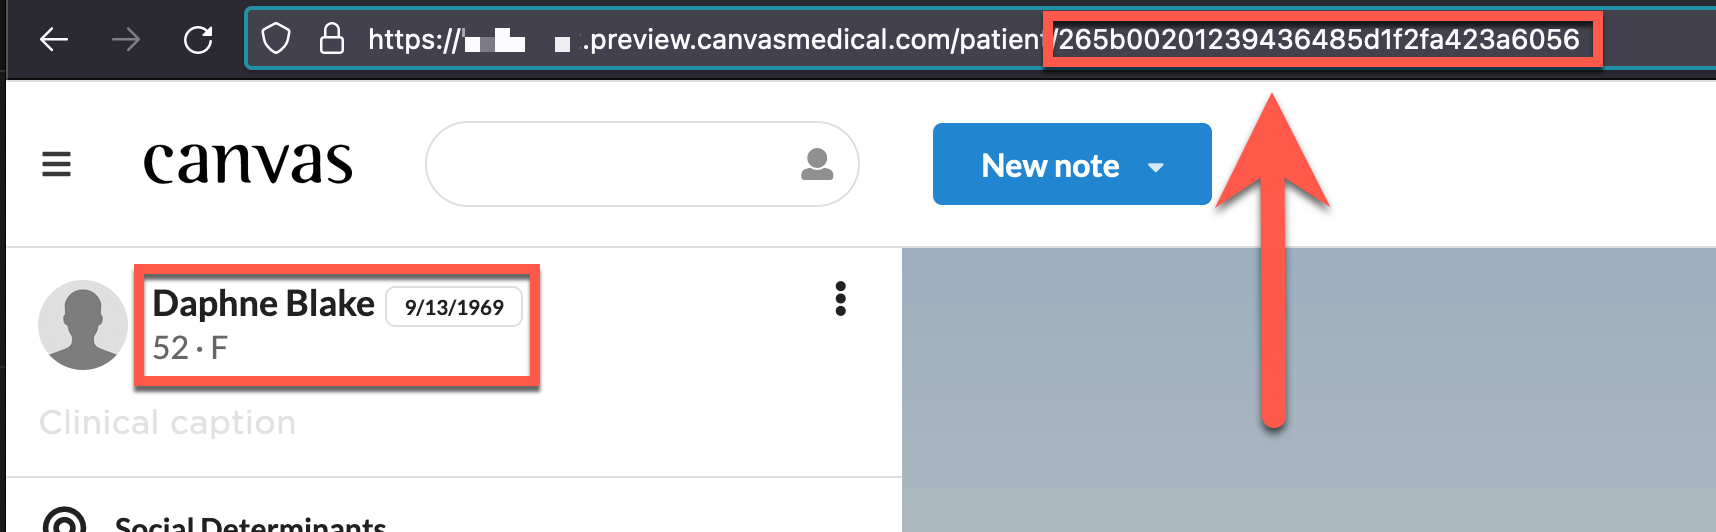
- The key we are looking for is contained in the URL of the patient’s chart page:
Now that your patients/ directory has been created and you have found a patient’s key, navigate into the patients directory:
(env) $ cd patients
Run the following canvas-cli fixture-from-patient command (replace <patient_key> with the key from above):
(env) $ canvas-cli fixture-from-patient <patient_key>
You should get a success message and a directory containing the patient’s data:
(env) $ canvas-cli fixture-from-patient 265b00201239436485d1f2fa423a6056
Successfully wrote patient fixture to /Users/{username}/Projects/canvas_protocols/patients/Daphne Smith 1969 (F)
The directory that is created is a series of JSON files built from the patient record keys (billing_line_items.json, conditions.json, imaging_reports.json, etc.):
(env) $ cd Daphne\ Blake\ 1969\ \(F\)/
(env) $ ls
billing_line_items.json
conditions.json
imaging_reports.json
immunizations.json
inpatient_stay.json
instructions.json
interviews.json
lab_reports.json
medications.json
messages.json
patient.json
protocol_overrides.json
protocols.json
reason_for_visits.json
referral_reports.json
referrals.json
suspect_hccs.json
upcoming_appointment_notes.json
upcoming_appointments.json
vital_signs.json
Repeat the above steps to retrieve 1 or more patients.
We will see how these patient data files can be used for development and testing in the next section.
Viewing Patient Data Directly In a Browser #
Another option for viewing patient data is directly in a browser. The following URL in your Canvas instance will show patient data in a json structure (replace {patient_key} with a valid patient key and {your_canvas_instance} with the name of your instance):
https://{your_canvas_instance}.canvasmedical.com/api/PatientProtocolInput/{patient_key}/
The data shown in this URL will match the data fetched using the fixture-from-patient command. The only difference between the json files and the URL data are that each json key in the URL is represented as a separate file in the local data that was fetched from the instance.
Protocols Within Canvas #
The SDK allows developers to create customized Protocols that will be utilized within a Canvas instance. Protocols are recommendations of care, screenings or actions for patients that fit certain criteria, such as age, medical history or a combination of factors.
More information about Protocols can be found in the Canvas Knowledge Center.
There are two places within the Canvas UI that Protocols can be found:
In a patient’s chart:
Protocols that are recommended for a patient are shown after clicking the icon that the arrow is pointing to below. The number in the red box shows that this patient has 5 active Protocols: 
Once the icon is clicked, the Protocols are displayed on the right-hand side of the chart. The ability to filter according to the Protocol status is available in the dropdown menu at the top. By default, a provider will see a patient’s Active Protocols: 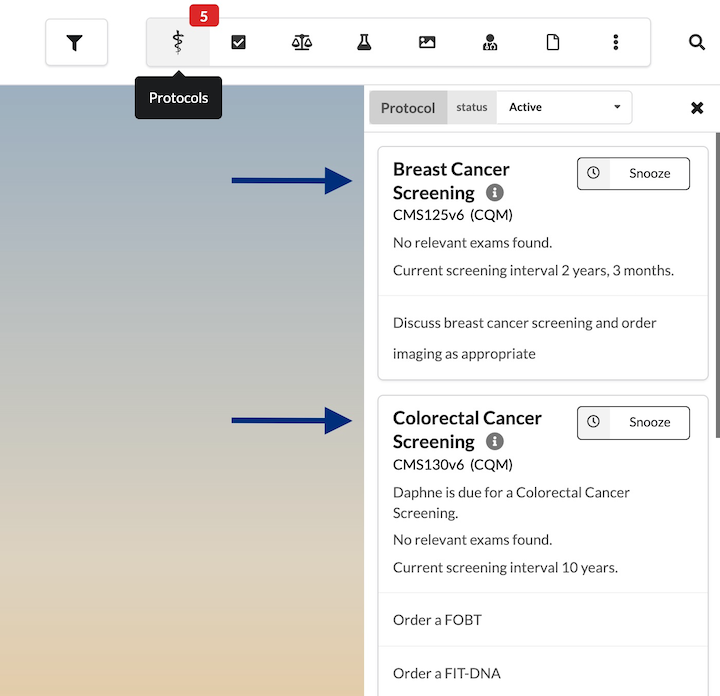
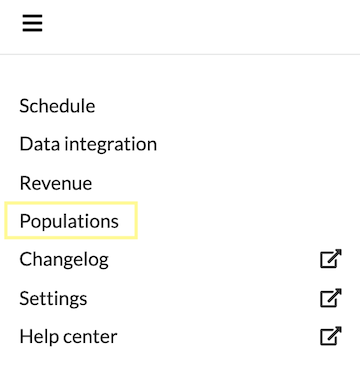
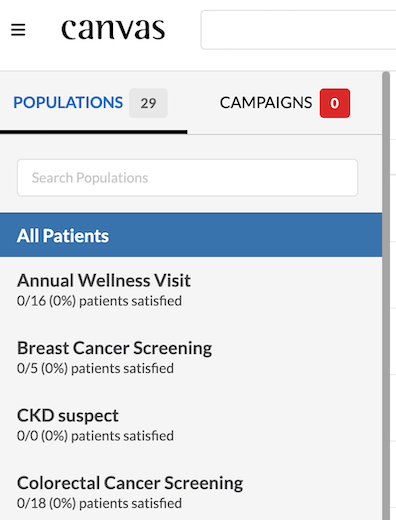
In the Populations section of the UI: The Populations section shows all active Protocols, a listing of patients that are recommended for that Protocol, as well as the ability to create a Campaign. For more information on Populations and Campaigns, see this article in the Canvas Knowledge Center. 
Creating a Protocol #
File Setup #
So far, you should have created a project directory (in our case, canvas_protocols), as well as a patients directory. The structure of your project should currently look like this:
canvas_protocols/
  patients/
    PATIENT NAME YYYY (F)/
    PATIENT NAME YYYY (M)/
Next, create a folder called src within the canvas_protocols directory. If you are currently still in the patients directory, you may need to move up one level:
(env) $ cd ..
(env) $ mkdir src
Your project structure should now look like this:
canvas_protocols/
  patients/
    PATIENT NAME YYYY (F)/
    PATIENT NAME YYYY (M)/
  src/
Navigate into your newly-created src directory, then create a file with a .py extension that you will be working in to create your first Protocol. We’ll call ours test_measure.py.
(env) $ cd src
(env) $ touch test_measure.py
Setting Up Initial Code #
Let’s begin by creating an example of a Protocol class in our Python file. Don’t worry if you don’t know what the following code means - it will be explained as we move through this tutorial.
Add the following code to test_measure.py:
from canvas_workflow_kit.protocol import (
    ClinicalQualityMeasure,
    ProtocolResult,
    STATUS_DUE,
    STATUS_SATISFIED
)

from canvas_workflow_kit.constants import CHANGE_TYPE
from canvas_workflow_kit.recommendation import Recommendation


class MyFirstProtocol(ClinicalQualityMeasure):

    class Meta:

        title = 'My First Protocol'

        description = 'My First Canvas Protocol'

        version = '2022-02-01v1'

        information = 'https://docs.canvasmedical.com'

        identifiers = ['CMS12345v1']

        types = ['CQM']

        compute_on_change_types = [
            CHANGE_TYPE.CONDITION
        ]

        references = [
            'Protocol Reference https://canvas-medical.zendesk.com/hc/en-us/articles/360057232994-Care-Protocols'
        ]


    def in_denominator(self):
        """
        Patients in the initial population.
        """
        return True

    def in_numerator(self):
        """
        Patients that have already been notified.
        """
        return False

    def compute_results(self):
        result = ProtocolResult()

        if self.in_denominator():
            if self.in_numerator():
                result.status = STATUS_SATISFIED
                result.add_narrative(
                    f'{self.patient.first_name} has been interviewed'
                )
            else:
                result.status = STATUS_DUE
                result.due_in = -1
                result.add_narrative(
                    f'{self.patient.first_name} is due for an interview'
                )

                result.add_recommendation(
                    Recommendation(
                        key='CMS12345v1_CHOICE_INTERVIEW',
                        title='Interview Patient About Choices'
                    )
                )
        return result
Let’s step through the example above:
- The
MyProtocolclass is an example of how a custom Protocol can be developed using the SDK. When developing your own classes, they should always inherit from SDK'sClinicalQualityMeasureclass as shown above. Your own Protocols, for example, may be named something likeHypertensionScreeningProtocolorDepressionAssessmentProtocoldepending on what type of Protocol is being developed. - The
ClinicalQualityMeasureMeta class contains the following attributes:
Name Type Required Description titlestring true The main Protocol title that will be shown on Patient charts and the Populations tab of the Canvas UI. descriptionstring false A more detailed description of the Protocol. This is displayed as the subheader on the Populations section of the Canvas UI. versionstring true A version number of your choice. This is to keep track of subsequent updates to your code for a specific Protocol. Every time a version is updated to your Canvas instance, it must have a unique version number. You may want to use a date (as shown in the example) or choose a versioning method of your own. informationstring false This is for the URL that populates in the More Info link for each Protocol listed on the Populations section of the UI. You may choose to populate this with the link to the page of an eCQI Protocol or to another resource of your choice. identifierslist[string] false This is a list of identifiers associated with the Protocol. These are sometimes populated with eCQI codes (e.g., CMS125v6), but can also be populated with strings of your choice to identify your custom Protocols. In the Canvas UI, these are populated underneath the Protocol title in a patient's chart. typeslist[string] true This is a list of shorthand, abbreviated types identified with the Protocol. Some industry standard examples of these are CCP, CQM, and HCC. These are populated in parentheses next to identifiers in the Protocols section of a patient's chart. compute_on_change_typeslist[CHANGE_TYPE] false The change types listed here signal the Canvas backend to know when the Protocol criteria should be rerun against patients. For example, if a patient begins a new medication, they may be eligible for a Protocol whereas they may not have been before. In this case, CHANGE_TYPE.MEDICATIONwould be included in this list. A full list of CHANGE_TYPE choices are available here.referenceslist[string] false A list of references identified with the Protocol. These are listed when the information icon is clicked on the Protocol listing in a patient's chart. URLs that are included in each string are automatically detected and crafted as href links with the display text. - The
in_numeratorandin_denominatormethods, though not filled out in the example above, are methods that can be used to compile patients into different groups. Each group can then be used in conditional logic withincompute_results. We will look more at how these methods can be used a little later in the tutorial. - The
compute_resultsmethod is the main method that is called by the Canvas backend to determine the Protocol status and recommendations for a patient. You should always return an instance ofProtocolResultin this method. TheProtocolResultclass has the following attributes that can be set:
Name Type Required Description status_choice_ false This represents the status of the Protocol for a patient. The choices can be imported from canvas_workflow_kit.protocolas follows:
STATUS_DUESTATUS_PENDINGSTATUS_NOT_APPLICABLESTATUS_SATISFIEDSTATUS_UNCHANGED
In a patient's chart in the Canvas UI, Protocols with astatusofSTATUS_DUEwill show under the Active status, whileSTATUS_PENDINGwill show under Pending. Protocols with a status ofSTATUS_SATISFIED, meaning the patient has fulfilled all of the requirements, will show under the Inactive status. Protocols with astatusofSTATUS_NOT_APPLICABLEwill not show in a patient's chart. Protocols with astatusofSTATUS_UNCHANGEDwill ignore the current protocol run, maintaining whatever the result of the previous protocol run was. This can be useful in cases where the changed fields are not relevant.due_ininteger false An integer that represents the number of days for when the patient is due for the Protocol. For example, if patient John is due for a Protocol 2 weeks after becoming eligible, this field would be populated with 14. Negative integers are also allowed, and a value of -1 can be used for patients that are currently due. narrativeslist[str] false A list of text items that will be displayed on a patient's chart within each Protocol. Each item should be thought of as being within the context of a particular patient, which can be accessed through the self.patientattribute. Narrative text can be appended to thenarrativeslist by calling theadd_narrative()method as shown in the example above. - Recommended actions that can be taken to resolve a Protocol for a patient are presented in the bottom portion of each Protocol listed on a patient's chart. Recommendations can be added to each instance of
ProtocolResultby using theadd_recommendation()method. There are many built-in types of Recommendations available. Let's look at what makes up a standardRecommendationobject:
Name Type Required Description keystring true A unique identifier for the recommendation. rankinteger false A value to control the sort order of recommendations within a Protocol. For each Protocol listed in the Canvas UI, recommendations with lower rank values will appear at the top. titlestring true The text to show on a patient's chart to identify and describe the recommendation.
Uploading Your Protocol #
Canvas instances have a number of built-in Protocols. The Protocols that are developed using the SDK, such as our example above, can be uploaded and run on the Canvas backend in the same manner that the built-in Protocols are.
At this point, you will have a completed Protocol with all of the Meta attributes populated, as well as a compute_results method that returns an instance of ProtocolResult. While this is a very basic example, it is enough to upload to your Canvas development instance in order to test with and to see what appears in the UI.
To upload your code to your Canvas instance, pass the file name of your measure to the canvas_cli upload command. Make sure you are in the same directory as your file and run the following command in your terminal:
(env) $ canvas-cli upload test_measure.py
On successful upload, you should see the following message:
(env) $ canvas-cli upload test_measure.py
Uploading test_measure.py...
Upload successful.  Version 2022-02-01v1 set to latest version.
Next, pull up the chart of any patient. You should see your Measure appear in the Protocols section of that patient’s chart:

By default, a protocol will recompute for all patients after it is uploaded (unless it is a notification protocol). If you wish to upload a protocol without recomputing for all patients, you can use the --no-compute flag with the upload command, like so:
(env) $ canvas-cli upload test_measure.py --no-compute
This can be useful for times when you want to make an update to your protocol (like a docstring change), but don’t find it necessary to recompute for all patients at that time. The --no-compute flag is only available in versions of the canvas-workflow-kit >= v0.6.10, so be sure to upgrade before you use it!
Testing Your Protocol Against Patient Data #
So far in this tutorial, you have created a basic Protocol, uploaded it to your development Canvas instance, and seen how it appears in the UI. This was a very basic measure used for example purposes. However, much more complex logic can and will be used when developing actual Protocols. For this reason, the SDK includes a command named test-fixture in order to test your code against patient data locally.
In the previous section, it was explained how to fetch patient data that is stored locally in *.json files. To test the Protocol that you just created in test_measure.py, the following command can be run from within the src directory:
(env) $ canvas-cli test-fixture test_measure.py ../patients
This command will run the Protocol against each patient in the /patients/ directory. If there are Protocol recommendations for a patient, those details will be printed to the console. If there are no recommendations for a patient, that will also be printed under the patient’s name. Once run, the output in the terminal should look something like this:

Expanding a Protocol #
Building on our previous example, we will now explore how to create logic to tell if a patient has or has not satisfied the requirements for fulfilling a Protocol. This is important in order to only display Protocol alerts for those that have not been satisfied. Conversely, we also want to display information about the Protocol under the Inactive status if it indeed has been satisfied.
To help visualize this, let’s say that we want to develop a Protocol for all patients 65 and older to be interviewed in order to screen their risk of falling. Patients who are eligible for this Protocol should be interviewed once a year.
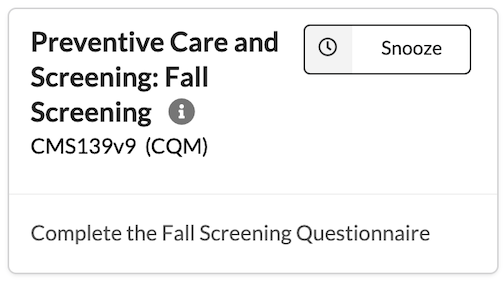
As an example, a new patient, John Smith, is over 65 and thus would be due for our Fall Screening Protocol. Here is how the Protocol is displayed in John’s chart when he arrives for his first appointment:
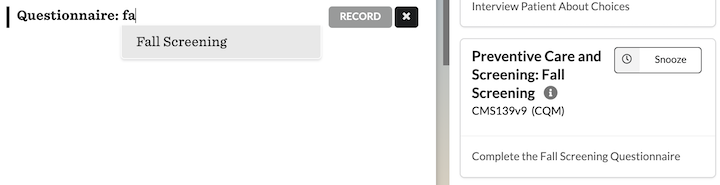
As recommended, John’s physician can then complete the Fall Questionnaire in his chart:
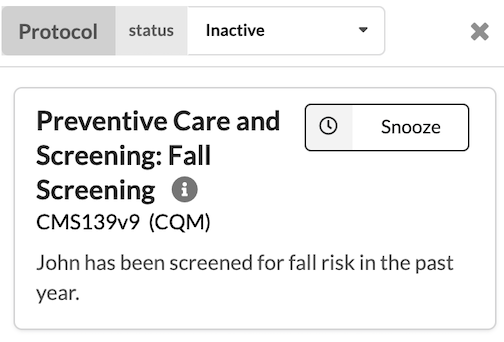
Once the recommended Fall Screening Questionnaire has been completed, the Protocol is considered to have been satisfied. It is now moved to the Inactive tab in John’s chart:
The in_numerator and in_denominator Methods #
In the context of our custom Protocol code, we want to be able to tell whether a patient such as John has completed the requirements to satisfy a Protocol, such as the completion of the Fall Screening Questionnaire. This can be done by using the in_numerator and in_denominator methods. The results of these methods can then be used with logic within compute_results.
Using our example above, the in_denominator method can be used to see if John exists in the population of patients that should receive the screening. The Fall Screening applies to all patients 65 or older, so our code for this method should look like this:
def in_denominator(self):
    return self.patient.age_at(self.now) >= 65
Now let’s compute whether or not John has already satisfied this Protocol. Since we saw above that the Fall Screening Protocol is satisfied after completion of the Fall Screening Questionnaire, we can see if John has fulfilled this requirement within the in_numerator method. First, import the relevant screening object from the Canvas Workflow Kit (we’ll go into more detail about these shortly):
from canvas_workflow_kit.value_set.v2021 import FallsScreening
from canvas_workflow_kit.timeframe import Timeframe
def in_numerator(self):
    last_screening_timeframe = Timeframe(self.now.shift(years=-1), self.now)
    falls_screening = self.patient.interviews.find(
        FallsScreening
    ).within(last_screening_timeframe)
    return bool(falls_screening)
The methods above will tell us two things about our patient John:
- The
in_denominatormethod will tell us if John is an applicable candidate for this Protocol. Since he is in the 65 or older age bracket, this will returnTrue. - The
in_numeratormethod will tell us if John has completed the Fall Screening Questionnaire within the last year. Since he has, this will also return True.
Incorporating Logic into compute_results #
We can now use the logic from both of these methods in compute_results:
    def compute_results(self):
        result = ProtocolResult()
        if self.in_denominator(): # Patient is 65 or older
            if self.in_numerator(): # Has completed the Screening
                result.status = STATUS_SATISFIED
                result.add_narrative(
                    f'{self.patient.first_name} has been screened for fall risk in the past year.'
                )
            else: # Has not completed the Screening
                result.status = STATUS_DUE
                result.due_in = -1
                result.add_recommendation(
                    InterviewRecommendation(
                        key='CMS139v9_INTERVIEW_RECOMMENDATION',
                        rank=1,
                        button='Interview',
                        patient=self.patient,
                        questionnaires=[FallsScreening],
                        title=f'Complete the Fall Screening Questionnaire',
                    )
                )
        return result
As you can see above, we marked the Status as STATUS_DUE for when John had not completed the Questionnaire, as well as a recommendation to do so. After John had completed the Questionnaire, a status of STATUS_SATISFIED was set.
A Complete Example #
Here is the complete example of the Protocol for the example above:
from canvas_workflow_kit.protocol import (
    ClinicalQualityMeasure,
    ProtocolResult,
    STATUS_DUE,
    STATUS_SATISFIED,
)
from canvas_workflow_kit.constants import CHANGE_TYPE
from canvas_workflow_kit.recommendation import InterviewRecommendation


from canvas_workflow_kit.value_set.v2021 import (
    FallsScreening
)
from canvas_workflow_kit.timeframe import Timeframe


class SeniorFallProtocol(ClinicalQualityMeasure):

    class Meta:

        title = 'Preventive Care and Screening: Fall Screening'

        description = 'Fall Screening for Patients 65 and older'

        version = '2022-02-01v7'

        information = 'https://ecqi.healthit.gov/ecqm/ep/2021/cms139v9'

        identifiers = ['CMS139v9']

        types = ['CQM']

        compute_on_change_types = [
            CHANGE_TYPE.CONDITION,
            CHANGE_TYPE.PATIENT,
        ]

        references = [
            'Falls: Screening for Future Fall Risk https://ecqi.healthit.gov/ecqm/ep/2021/cms139v9'
        ]

    def in_denominator(self):
        """
        Patients in the initial population.
        """
        return self.patient.age_at(self.now) >= 65

    def in_numerator(self):
        last_screening_timeframe = Timeframe(self.now.shift(years=-1), self.now)
        falls_screening = self.patient.interviews.find(
            FallsScreening
        ).within(last_screening_timeframe)
        return bool(falls_screening)

    def compute_results(self):
        result = ProtocolResult()
        if self.in_denominator(): # Patient is 65 or older
            if self.in_numerator(): # Has completed the Screening
                result.status = STATUS_SATISFIED
                result.add_narrative(
                    f'{self.patient.first_name} has been screened for fall risk in the past year.'
                )
            else: # Has not completed the Screening
                result.status = STATUS_DUE
                result.due_in = -1
                result.add_recommendation(
                    InterviewRecommendation(
                        key='CMS139v9_INTERVIEW_RECOMMENDATION',
                        rank=1,
                        button='Interview',
                        patient=self.patient,
                        questionnaires=[FallsScreening],
                        title=f'Complete the Fall Screening Questionnaire',
                    )
                )
        return result
Recommendations and Next Steps #
You may have noticed that instead of using a generic Recommendation in our add_recommendation method, we used an InterviewRecommendation. The SDK includes a number of recommendation classes, which you can explore in the Canvas SDK Recommendation Types doc.