Building a Custom Portal Landing Page
This guide provides examples of how to leverage patient data to personalize the portal landing page, and explains how to integrate the ready-made widgets provided by Canvas.
What Are Widgets in the Patient Portal? #
Widgets in the patient portal are interactive components that enhance the user experience by providing quick access to information and functionalities. They can display key details like upcoming appointments. Widgets can be fully customized with unique content or leverage ready-made components—such as Appointments and Messaging provided by Canvas to ensure consistency and ease of use. These widgets are organized on the landing page using a grid layout, which supports various sizes to optimize the visual presentation and responsiveness across different devices.
How to add a Widget? #
A widget can be added by listening to the PATIENT_PORTAL__WIDGET_CONFIGURATION event and returning one or several PortalWidget
Step 1: Initialize a plugin #
The Canvas CLI gives you a great head start when creating a plugin. Simply run
canvas init
Then, follow the prompts to name and configure your new plugin project.
Step 2: Update your handler #
Modify your handler to handle the widget configuration event. For example:
from canvas_sdk.effects.widgets import PortalWidget
from canvas_sdk.events import EventType
from canvas_sdk.handlers import BaseHandler

class Protocol(BaseHandler):
    RESPONDS_TO = EventType.Name(EventType.PATIENT_PORTAL__WIDGET_CONFIGURATION)

    def compute(self):
        widget = PortalWidget(
          content="Hello World",
          size=PortalWidget.Size.COMPACT,
          priority=10
        )
        return [widget.apply()]
This code listens for the PATIENT_PORTAL__WIDGET_CONFIGURATION event and, when triggered, creates a new widget with a simple “Hello World” message, a compact size, and a priority of 10.
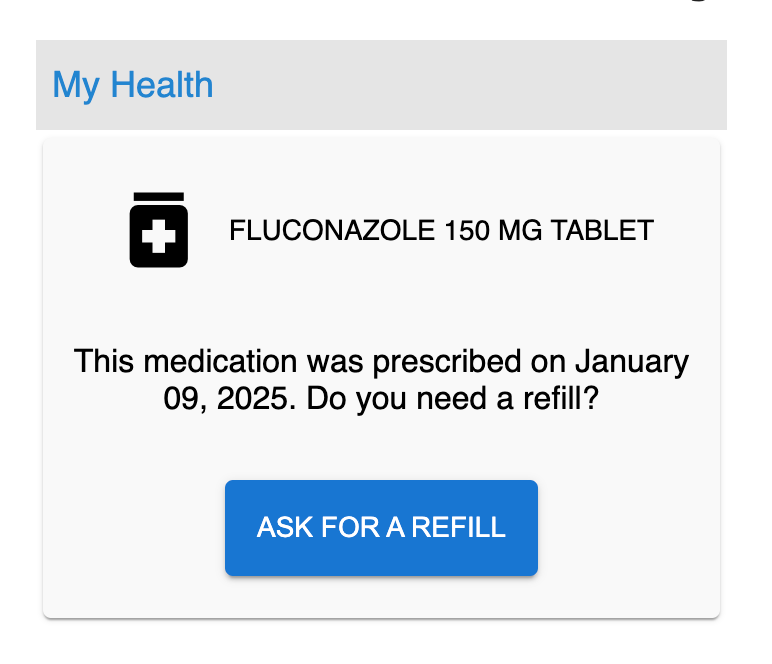
Patient medication widget #
This widget will show the last medication and CTA to request a refill.
So let’s update the example above to:
- Fetch the patient’s medication.
- Leverage HTML templating to display the necessary information
Step 1: Fetch patient medication #
Since the event includes the patient object, you can easily access all the necessary data. Add the following snippet to your compute method to retrieve the patient’s details:
patient = Patient.objects.get(id=self.target)
last_medication = patient.medications.last()
Step 2: Prepare HTML template #
Create a templates folder inside your plugin’s folder:
mkdir templates
Add the HTML file:
touch medication_widget.html
And add the following HTML:
<!DOCTYPE html>
<html lang="en">
<head>
  <meta charset="UTF-8">
  <meta name="viewport" content="width=device-width, initial-scale=1">
  <style>
    body, html {
      height: 100%;
      width: 100%;
      margin: 0;
      font-family: "Roboto","Helvetica","Arial",sans-serif;
      font-size: 16px;
    }
  </style>
</head>
<body>
</body>
</html>
Step 3: Design your widget #
While you can design your widget in any way that suits your needs, for this example we’ll create one featuring a header and a card component. The card will display the medication name, the prescription date, and a clear call-to-action (CTA) button that redirects the patient to the messaging page to request a refill.
Header #
A light gray background color and a blue text to ensure it matches the patient portal aesthetic.
<style>
  .header {
      padding: 8px;
      background: #E5E5E5;
      color: #2185D0;
      text-align: left;
      margin: 0;
      font-weight: 500;
      font-size: 18px;
      line-height: 1.6;
    }
</style>

<body>
    <div class="header">My Health</div>
</body>
Card Component #
We will add template variables for the medication name and start date, allowing these values to be dynamically updated in the plugin.
<body>
  <div class="widget">
    <div class="medication-info">
      <span class="material-icons">medication</span>
      <span>{{name}}</span>
    </div>
    <p style="padding: 0 12px">This medication was prescribed on {{start_date}}. Do you need a refill?</p>
    <button onclick="onClick()">Ask for a refill</button>
  </div>

  <script>
    function onClick() {
      window.top.location.href = "http://localhost:8000/app/messaging"
    }
  </script>
</body>
Let’s dive in and add some styles to the card.
Our widget class ensures that all elements are both vertically and horizontally centered, creating a sleek card design with rounded borders and a subtle shadow for a modern, elevated look.
.widget {
  display: flex;
  flex-direction: column;
  justify-content: center;
  align-items: center;
  width: 98%;
  height: 80%;
  border-radius: 4px;
  box-shadow: 0 2px 1px -1px rgba(0, 0, 0, 0.2), 0 1px 1px 0 rgba(0, 0, 0, 0.14), 0 1px 3px 0 rgba(0, 0, 0, 0.12);
  background-color: #f9f9f9;
  text-align: center;
  margin: 4px auto auto;
}
Our medication info section will feature a Material UI icon next to the medication name, providing a clear and modern visual representation consistent with the portal’s design aesthetic.
.medication-info {
  display: flex;
  align-items: center;
  gap: 10px;
  margin-bottom: 15px;
  padding: 0 8px;
  font-size: 14px;
}
.material-icons {
  font-size: 50px;
}
And finally, we style the CTA button to mimic a Material UI button, ensuring it aligns perfectly with the portal’s overall design aesthetic.
button {
  margin-top: 16px;
  background-color: #1976d2;
  color: #fff;
  border: none;
  border-radius: 4px;
  padding: 16px 16px;
  font-size: 14px;
  min-width: 64px;
  text-transform: uppercase;
  box-shadow: 0 3px 1px -2px rgba(0,0,0,0.2),
              0 2px 2px 0 rgba(0,0,0,0.14),
              0 1px 5px 0 rgba(0,0,0,0.12);
  cursor: pointer;
  transition: background-color 0.3s ease;
}

button:hover {
  background-color: #115293;
}
Step 4: Tying everything together #
Update your plugin’s compute method to pass the desired values for medication name and start date using render_to_string function
medication_info = {
    "start_date": last_medication.start_date.strftime("%B %d, %Y"),
    "name": last_medication.codings.first().display
}

widget = PortalWidget(content=render_to_string("templates/medication_widget.html", medication_info), size=PortalWidget.Size.COMPACT, priority=10)
Full Example #
from canvas_sdk.effects.widgets import PortalWidget
from canvas_sdk.events import EventType
from canvas_sdk.handlers import BaseHandler
from canvas_sdk.templates import render_to_string
from canvas_sdk.v1.data import Patient


class Protocol(BaseHandler):
    RESPONDS_TO = EventType.Name(EventType.PATIENT_PORTAL__WIDGET_CONFIGURATION)

    def compute(self):
        patient = Patient.objects.get(id=self.target)
        last_medication = patient.medications.last()

        medication_info = {
            "start_date": last_medication.start_date.strftime("%B %d, %Y"),
            "name": last_medication.codings.first().display
        }

        medication_widget = PortalWidget(
          content=render_to_string("templates/medication_widget.html", medication_info),
          size=PortalWidget.Size.COMPACT,
          priority=10
        )
        return [medication_widget.apply()]
<!DOCTYPE html>
<html lang="en">
<head>
  <meta charset="UTF-8">
  <meta name="viewport" content="width=device-width, initial-scale=1">
  <link href="https://fonts.googleapis.com/icon?family=Material+Icons" rel="stylesheet">
  <style>
    body, html {
      height: 100%;
      width: 100%;
      margin: 0;
      font-family: "Roboto","Helvetica","Arial",sans-serif;
      font-size: 16px;
    }
    .widget {
      display: flex;
      flex-direction: column;
      justify-content: center;
      align-items: center;
      width: 98%;
      height: 80%;
      border-radius: 4px;
      box-shadow: 0 2px 1px -1px rgba(0, 0, 0, 0.2), 0 1px 1px 0 rgba(0, 0, 0, 0.14), 0 1px 3px 0 rgba(0, 0, 0, 0.12);
      background-color: #f9f9f9;
      text-align: center;
      margin: 4px auto auto;
    }

    .header {
      padding: 8px;
      background: #E5E5E5;
      color: #2185D0;
      text-align: left;

      margin: 0;
      font-weight: 500;
      font-size: 18px;
      line-height: 1.6;
    }

    .medication-info {
      display: flex;
      align-items: center;
      gap: 10px;
      margin-bottom: 15px;
      padding: 0 8px;
      font-size: 14px;
    }
    .material-icons {
      font-size: 50px;
    }

    button {
      margin-top: 16px;
      background-color: #1976d2;
      color: #fff;
      border: none;
      border-radius: 4px;
      padding: 16px 16px;
      font-size: 14px;
      min-width: 64px;
      text-transform: uppercase;
      box-shadow: 0 3px 1px -2px rgba(0,0,0,0.2),
                  0 2px 2px 0 rgba(0,0,0,0.14),
                  0 1px 5px 0 rgba(0,0,0,0.12);
      cursor: pointer;
      transition: background-color 0.3s ease;
    }
    button:hover {
      background-color: #115293;
    }
  </style>
</head>
<body>
  <div class="header">My Health</div>
  <div class="widget">
    <div class="medication-info">
      <span class="material-icons">medication</span>
      <span>{{name}}</span>
    </div>
    <p style="padding: 0 12px">This medication was prescribed on {{start_date}}. Do you need a refill?</p>
    <button onclick="onClick()">Ask for a refill</button>
  </div>

  <script>
    function onClick() {
      window.top.location.href = "http://localhost:8000/app/messaging"
    }
  </script>
</body>
</html>
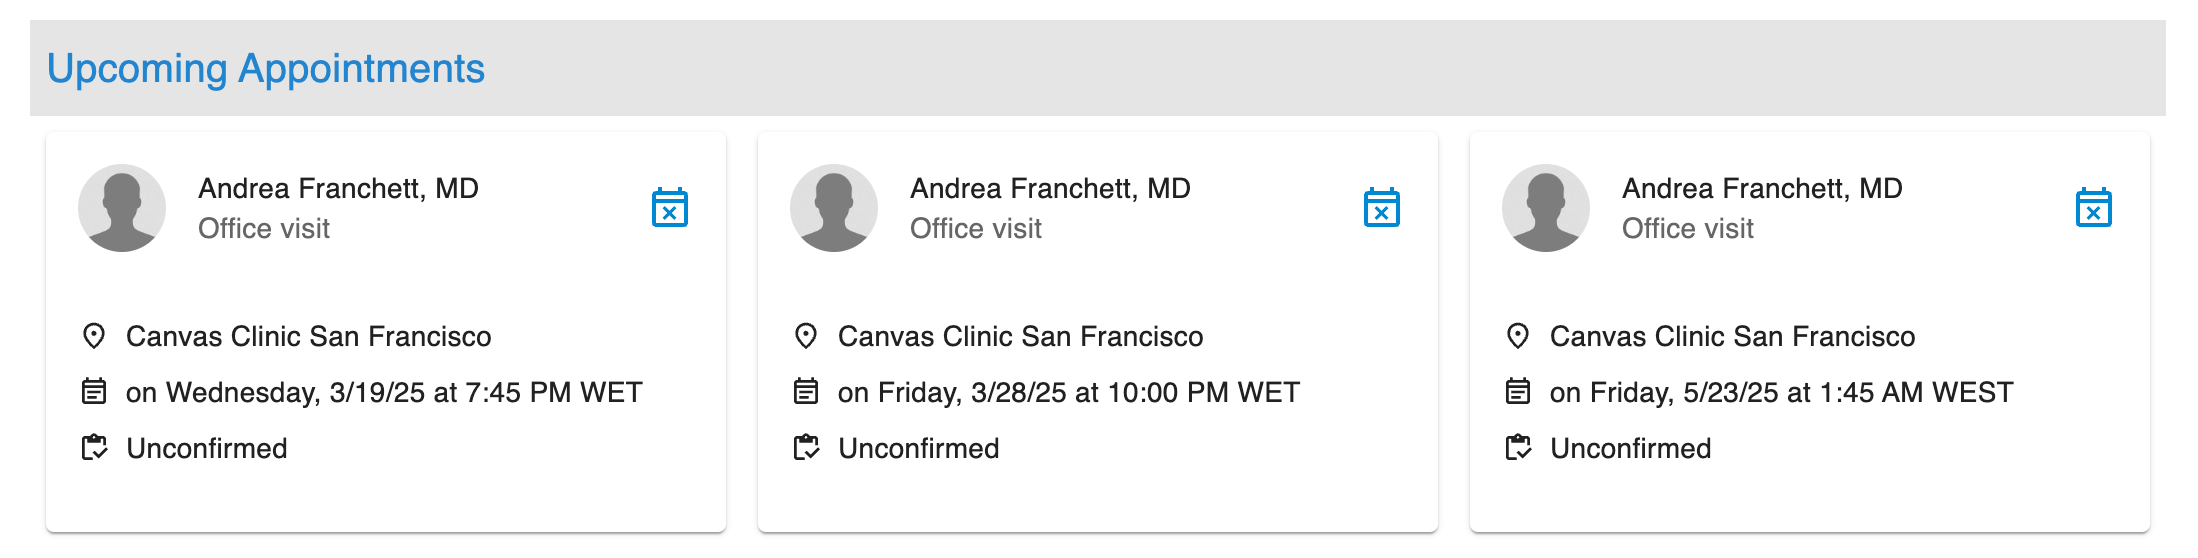
Upcoming appointments Widget provided by Canvas #
This is one of the ready-made widgets provided by Canvas that you can add to your patient portal. It will show upcoming appointments.
Step 1: Add a new handler to your plugin #
Create a new handler in your plugin with the following content:
from canvas_sdk.effects.widgets import PortalWidget
from canvas_sdk.events import EventType
from canvas_sdk.handlers import BaseHandler

class UpcomingAppointmentWidget(BaseHandler):
    RESPONDS_TO = EventType.Name(EventType.PATIENT_PORTAL__WIDGET_CONFIGURATION)

    def compute(self):
        widget = PortalWidget(component=PortalWidget.Component.APPOINTMENTS, priority=25)
        return [widget.apply()]