Layout Effects
Patient Summary #
There are many summary sections in a patient’s chart, organized by data type. While there is a default ordering, you can use an Effect to reorder them or hide some of them entirely. The PatientChartSummaryConfiguration class helps you craft the effect to do so.
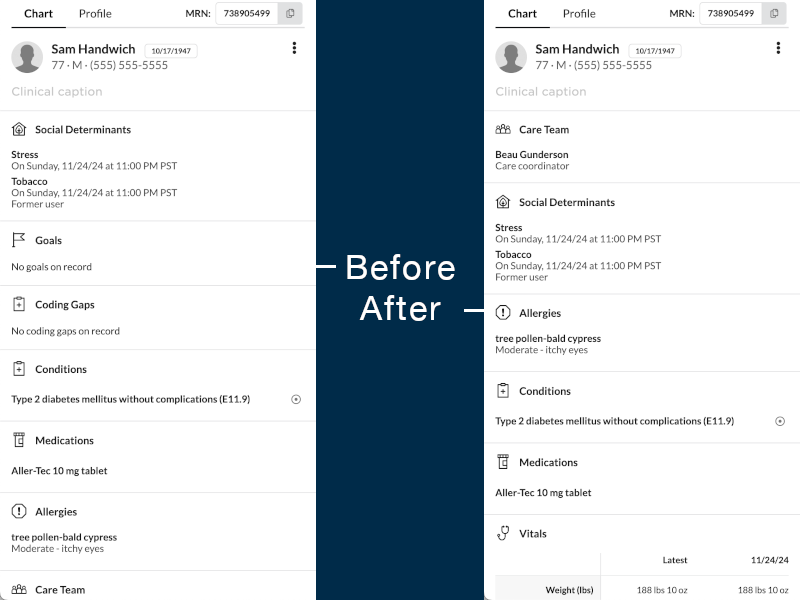
The example below shows reordering and hiding or omitting some of the sections:
from canvas_sdk.events import EventType
from canvas_sdk.handlers.base import BaseHandler
from canvas_sdk.effects.patient_chart_summary_configuration import PatientChartSummaryConfiguration


class SummarySectionLayout(BaseHandler):
    RESPONDS_TO = EventType.Name(EventType.PATIENT_CHART_SUMMARY__SECTION_CONFIGURATION)

    def compute(self):
        layout = PatientChartSummaryConfiguration(sections=[
          PatientChartSummaryConfiguration.Section.CARE_TEAMS,
          PatientChartSummaryConfiguration.Section.SOCIAL_DETERMINANTS,
          PatientChartSummaryConfiguration.Section.ALLERGIES,
          PatientChartSummaryConfiguration.Section.CONDITIONS,
          PatientChartSummaryConfiguration.Section.MEDICATIONS,
          PatientChartSummaryConfiguration.Section.VITALS,
        ])

        return [layout.apply()]
Methods #
apply() → Effect #
Sets the order and visibility of the chart summary sections. It is only used in response to the PATIENT_CHART_SUMMARY__SECTION_CONFIGURATION event, and does nothing in any other context.
sectionsis required, with at least one section.
Attributes #
| Attribute | Type | Description | Required |
|---|---|---|---|
sections | list[Section \| CustomSection] | The sections to show, in order. Each is a PatientChartSummaryConfiguration.Section or a PatientChartSummaryConfiguration.CustomSection(name=...) for a custom section. Sections you leave out are hidden. | Yes |
Values in the PatientChartSummaryConfiguration.Section enum are:
| Constant | Description |
|---|---|
| SOCIAL_DETERMINANTS | social_determinants |
| GOALS | goals |
| CONDITIONS | conditions |
| MEDICATIONS | medications |
| ALLERGIES | allergies |
| CARE_TEAMS | care_teams |
| VITALS | vitals |
| IMMUNIZATIONS | immunizations |
| SURGICAL_HISTORY | surgical_history |
| FAMILY_HISTORY | family_history |
| CODING_GAPS | coding_gaps |
Custom Sections #
In addition to the built-in sections above, you can add fully custom sections to the chart summary. Custom sections render plugin-provided content in an iframe and are identified by a unique key. See Patient Chart Summary Custom Section Handler for details on how to implement one.
Action Buttons #
Each section of the patient chart can also be customized with action buttons. Please refer to the Action Buttons documentation for more information.
Patient Profile #
The PatientProfileConfiguration class allows you to reorder, hide, and/or specificy whether sections load expanded or collapsed.
import json

from canvas_sdk.effects import Effect, EffectType
from canvas_sdk.effects.patient_profile_configuration import PatientProfileConfiguration
from canvas_sdk.events import EventType
from canvas_sdk.handlers import BaseHandler
from logger import log


class MyHandler(BaseHandler):
    """This protocol is used to configure which sections appear in the Patient Profile section.

    The SHOW_PATIENT_PROFILE_SECTIONS payload expects a list of sections where each section is a dict like { "type": str, "start_expanded": bool }
    The accepted values for the "type" are:
    "demographics", "preferences", "preferred_pharmacies", "patient_consents",
    "care_team", "parent_guardian", "addresses", "phone_numbers", "emails", "contacts"
    """

    # Name the event type you wish to run in response to
    RESPONDS_TO = EventType.Name(EventType.PATIENT_PROFILE__SECTION_CONFIGURATION)

    def compute(self) -> list[Effect]:
        """This method gets called when an event of the type RESPONDS_TO is fired."""

        sections = [
            PatientProfileConfiguration.Payload(type=PatientProfileConfiguration.Section.PREFERENCES,
                                                             start_expanded=False),
            PatientProfileConfiguration.Payload(type=PatientProfileConfiguration.Section.DEMOGRAPHICS,
                                                             start_expanded=False),
            PatientProfileConfiguration.Payload(
                type=PatientProfileConfiguration.Section.PREFERRED_PHARMACIES, start_expanded=True),
            PatientProfileConfiguration.Payload(type=PatientProfileConfiguration.Section.PARENT_GUARDIAN,
                                                             start_expanded=False),
            PatientProfileConfiguration.Payload(type=PatientProfileConfiguration.Section.CONTACTS,
                                                start_expanded=True),
            PatientProfileConfiguration.Payload(type=PatientProfileConfiguration.Section.CARE_TEAM,
                                                             start_expanded=False),
            PatientProfileConfiguration.Payload(type=PatientProfileConfiguration.Section.TELECOM,
                                                             start_expanded=False),
            PatientProfileConfiguration.Payload(type=PatientProfileConfiguration.Section.ADDRESSES,
                                                             start_expanded=False),
            PatientProfileConfiguration.Payload(type=PatientProfileConfiguration.Section.PATIENT_CONSENTS,
                                                start_expanded=False),
        ]

        effect = PatientProfileConfiguration(sections=sections).apply()

        return [effect]
Methods #
apply() → Effect #
Sets the order, visibility, and expansion of the patient profile sections. It is only used in response to the PATIENT_PROFILE__SECTION_CONFIGURATION event, and does nothing in any other context.
sectionsis required, with at least one section.
Attributes #
| Attribute | Type | Description | Required |
|---|---|---|---|
sections | list[Payload] | The sections to show, in order. Each PatientProfileConfiguration.Payload is a typed dictionary with a type (a PatientProfileConfiguration.Section) and a start_expanded boolean, which determines if the fields in that section are exposed by default. | Yes |
Values in the PatientProfileConfiguration.Section enum are:
| Constant | Description |
|---|---|
| DEMOGRAPHICS | demographics |
| PREFERENCES | preferences |
| PREFERRED_PHARMACIES | preferred_pharmacies |
| PATIENT_CONSENTS | patient_consents |
| CARE_TEAM | care_team |
| PARENT_GUARDIAN | parent_guardian |
| ADDRESSES | addresses |
| TELECOM | telecom |
| CONTACTS | contacts |
Panel Configuration #
This effect allows you to define which panel buttons should be displayed on the main page or the patient page.
The order of the buttons in the array will determine their order on the panel.
 (width:70%)
from canvas_sdk.effects.panel_configuration import PanelConfiguration

PanelConfiguration(
  sections=[
    PanelConfiguration.PanelPatientSection.REFILL_REQUEST,
    PanelConfiguration.PanelPatientSection.LAB_REPORT,
    PanelConfiguration.PanelPatientSection.CHANGE_REQUEST,
    PanelConfiguration.PanelPatientSection.TASK,
], page=PanelConfiguration.Page.PATIENT).apply()
Methods #
apply() → Effect #
Sets the panel buttons for the page.
sectionsandpageare required.- Every section must match the page:
PanelGlobalSectionvalues forGLOBAL,PanelPatientSectionvalues forPATIENT.
Attributes #
| Attribute | Type | Description | Required |
|---|---|---|---|
sections | list[PanelPatientSection] or list[PanelGlobalSection] | List of section items, in order. | Yes |
page | Page | PATIENT or GLOBAL. | Yes |
Values in the PanelGlobalSection enum are:
| Constant | Description |
|---|---|
| APPOINTMENT | appointment |
| CHANGE_REQUEST | changeRequest |
| IMAGING_REPORT | imagingReport |
| INPATIENT_STAY | inpatientStay |
| LAB_REPORT | labReport |
| MESSAGE | message |
| OUTSTANDING_REFERRAL | outstandingReferral |
| PRESCRIPTION_ALERT | prescriptionAlert |
| RECALL_APPOINTMENT | recallAppointment |
| REFERRAL_REPORT | referralReport |
| REFILL_REQUEST | refillRequest |
| TASK | task |
| UNCATEGORIZED_DOCUMENT | uncategorizedDocument |
Values in the PanelPatientSection enum are:
| Constant | Description |
|---|---|
| CHANGE_REQUEST | changeRequest |
| COMMAND | command |
| IMAGING_REPORT | imagingReport |
| INPATIENT_STAY | inpatientStay |
| LAB_REPORT | labReport |
| PRESCRIPTION_ALERT | prescriptionAlert |
| REFERRAL_REPORT | referralReport |
| REFILL_REQUEST | refillRequest |
| TASK | task |
| UNCATEGORIZED_DOCUMENT | uncategorizedDocument |
Patient Note Header Dropdown Configuration #
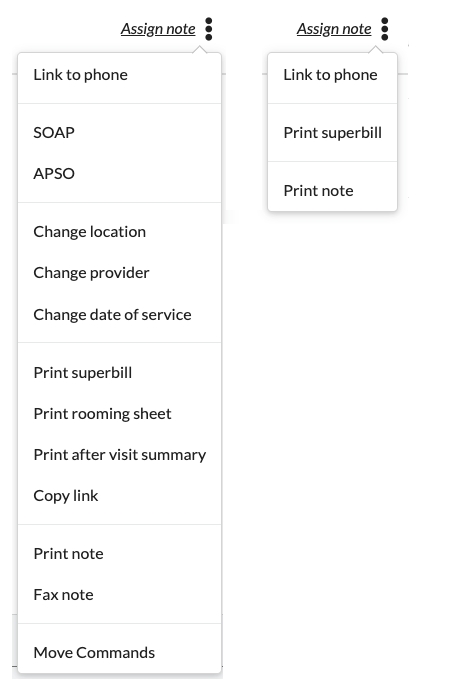
The PatientNoteHeaderDropdownConfiguration effect allows you to define which items appear in the dropdown menu on a patient’s note header (the triple dots at the top right of each note).
The order in the dropdown is preserved and grouped into specific sections, rather than being based on the plugin item order.
 (width:60%)
from canvas_sdk.effects.patient_note_header_dropdown_configuration import PatientNoteHeaderDropdownConfiguration
from canvas_sdk.events import EventType
from canvas_sdk.handlers import BaseHandler
from canvas_sdk.effects import Effect


class NoteHeaderDropdownHandler(BaseHandler):
    RESPONDS_TO = EventType.Name(EventType.PATIENT_NOTE_HEADER_DROPDOWN__SECTION_CONFIGURATION)

    def compute(self) -> list[Effect]:
        return [PatientNoteHeaderDropdownConfiguration(items=[
            PatientNoteHeaderDropdownConfiguration.Items.PRINT_NOTE,
            PatientNoteHeaderDropdownConfiguration.Items.PRINT_SUPERBILL,
            PatientNoteHeaderDropdownConfiguration.Items.LINK_TO_PHONE,
        ]).apply()]
Methods #
apply() → Effect #
Sets the items in the note header dropdown.
itemsis required, with at least one item.
Attributes #
| Attribute | Type | Description | Required |
|---|---|---|---|
items | list[Items] | List of dropdown items to display. | Yes |
Values in the PatientNoteHeaderDropdownConfiguration.Items enum are:
| Constant | Description |
|---|---|
| LINK_TO_PHONE | Show QR code to link mobile device to note |
| SOAP | Sort note sections in SOAP order (Subjective, Objective, Assessment, Plan) |
| APSO | Sort note sections in APSO order (Assessment, Plan, Subjective, Objective) |
| CHANGE_LOCATION | Change the note’s practice location |
| CHANGE_PROVIDER | Change the note’s provider |
| CHANGE_DATE_OF_SERVICE | Change the note’s date of service |
| PRINT_SUPERBILL | Print the superbill for billing |
| PRINT_ROOMING_SHEET | Print the rooming sheet for care team |
| PRINT_AFTER_VISIT_SUMMARY | Print the patient after visit summary |
| COPY_LINK | Copy the note’s permalink to clipboard |
| PRINT_NOTE | Print the note for care team |
| FAX_NOTE | Fax the note to an external recipient |
| FAX_EVENT_HISTORY | View fax event history for the note |
| MOVE_COMMANDS | Move commands from this note to another note |
Provider Menu Configuration #
The ProviderMenuConfiguration effect allows you to define which items appear in the provider menu (the hamburger menu at the top left of Canvas).
The effect replaces the default set of items, so every item that should stay visible has to be listed. Anything you omit is not rendered. If no installed plugin emits the effect, the menu renders unchanged.
Passing an empty list is allowed and hides every native item — useful if your plugin replaces the menu entirely with its own items.
from canvas_sdk.effects import Effect
from canvas_sdk.effects.provider_menu_configuration import ProviderMenuConfiguration
from canvas_sdk.events import EventType
from canvas_sdk.handlers import BaseHandler


class ProviderMenuHandler(BaseHandler):
    RESPONDS_TO = EventType.Name(EventType.GET_PROVIDER_MENU_CONFIGURATION)

    def compute(self) -> list[Effect]:
        return [ProviderMenuConfiguration(items=[
            ProviderMenuConfiguration.Items.PATIENTS,
            ProviderMenuConfiguration.Items.CAMPAIGNS,
            ProviderMenuConfiguration.Items.SETTINGS,
        ]).apply()]
Three things the effect does not do:
- It does not reorder the menu. Items render in Canvas’s native order and grouping, regardless of the order you list them in.
- It does not grant access. Permissions still apply on top, so an item you list will still render disabled for a user who lacks the permission for it.
- It does not affect plugin-provided menu items. Applications with the
provider_menu_itemscope are independent of the allow-list.
The user’s avatar and name, and the Sign out button, are always rendered and cannot be hidden.
Because this is an allow-list rather than a block-list, it does not pick up native items added in future Canvas releases. If a new item ships and you want it visible, add it to your list — otherwise it stays hidden on your instance.
When the allow-list is not applied #
Canvas falls back to rendering every native item, rather than a partial or empty menu, in each of these cases:
- No installed plugin responds to the event.
- The plugin raises while resolving the configuration.
- The allow-list reaches Canvas containing an item it does not recognize — the whole list is discarded, not just the unrecognized entry.
Passing something that is not an Items member raises a validation error when you construct ProviderMenuConfiguration, so most mistakes surface in your plugin before they ever reach Canvas.
If more than one installed plugin responds with a ProviderMenuConfiguration, the last effect Canvas receives wins — its allow-list replaces the earlier ones rather than merging with them.
Methods #
apply() → Effect #
Sets the native items shown in the provider menu.
itemsis required; an empty list hides every native item.
Attributes #
| Attribute | Type | Description | Required |
|---|---|---|---|
items | list[Items] | List of menu items to display. | Yes |
Values in the ProviderMenuConfiguration.Items enum are:
| Constant | Description |
|---|---|
| SCHEDULE | Go to the schedule page |
| PATIENTS | Go to the patient directory |
| REVENUE | Go to the revenue page |
| POPULATIONS | Go to the populations page |
| CAMPAIGNS | Go to the campaigns page |
| DATA_INTEGRATION | Go to the data integration queue |
| QUESTIONNAIRE_BUILDER | Go to the questionnaire builder |
| SETTINGS | Open the Canvas admin site in a new tab |
| MULTI_FACTOR_AUTHENTICATION | Open multi-factor authentication setup in a new tab |
| CHANGELOG | Open the Canvas release notes in a new tab |
| HELP_CENTER | Open the Canvas help center in a new tab |
| GOOGLE_CALENDAR | Open the Google Calendar sync page in a new tab |
Google Calendar sync is a beta feature, so GOOGLE_CALENDAR renders only on instances where it is turned on.
Hiding the Schedule item #
Hiding SCHEDULE does not change where providers land after logging in — that still defaults to the schedule page. Pair the effect with a DefaultHomepageEffect so providers do not arrive on a page they can no longer navigate back to.
from canvas_sdk.effects import Effect
from canvas_sdk.effects.default_homepage import DefaultHomepageEffect
from canvas_sdk.events import EventType
from canvas_sdk.handlers import BaseHandler


class ScheduleFreeHomepage(BaseHandler):
    RESPONDS_TO = EventType.Name(EventType.GET_HOMEPAGE_CONFIGURATION)

    def compute(self) -> list[Effect]:
        return [DefaultHomepageEffect(page=DefaultHomepageEffect.Pages.PATIENTS).apply()]
Hiding SCHEDULE also leaves the Appointments filter in the side panel in place. Removing the scheduling experience end to end means coordinating three independent controls: this effect for the menu item, PanelConfiguration for the Appointments filter, and DefaultHomepageEffect for the landing page.
Omitting SETTINGS or MULTI_FACTOR_AUTHENTICATION hides the links to the admin site and to multi-factor authentication setup, so make sure your users have another route to them if they need one.
Modals #
The LaunchModalEffect class allows you to launch modals in Canvas, providing a flexible way to display content or navigate to external resources.
Methods #
apply() → Effect #
Launches the modal for the user whose action triggered the handler. See Where Modals Open.
- Set at most one of
urlorcontent; setting both raises an error.
Attributes #
| Attribute | Type | Description | Required |
|---|---|---|---|
url | str | The URL to load within the modal. | No |
content | str | Content to display directly within the modal. | No |
target | TargetType | Where the modal is launched; see targets. Defaults to DEFAULT_MODAL. | No |
dismissible | bool | Whether the user can close a DEFAULT_MODAL themselves. Defaults to True. Set it to False for a blocking modal that only your application can close. | No |
title | str | The title of the modal, displayed when minimized. Defaults to Untitled. | No |
Targets #
LaunchModalEffect.TargetType values:
DEFAULT_MODAL: Opens the URL in a modal centered on the screen.NEW_WINDOW: Opens the content in a new browser window.RIGHT_CHART_PANE: Opens the URL in the right-hand pane of the patient chart.RIGHT_CHART_PANE_LARGE: Like above, but a bit wider. A right chart pane opened in a patient’s chart stays open while the user moves around that chart. This includes the chart, Profile, Documents, application tabs, and diagnostics. The content inside the pane isn’t reloaded, so it keeps its state. The pane closes when the user opens a different patient or leaves the chart.PAGE: Opens the content as a full page.NOTE: Opens the content within a note tab (used with Note Applications).DOCKED_PANE: Opens the content in a persistent pane pinned to an edge of the window. This target is returned by a Docked Application, which setsDOCK_EDGEandDOCK_SIZE.
Example #
from canvas_sdk.effects.launch_modal import LaunchModalEffect

class ModalEffectHandler:
    def compute(self):
        modal_effect = LaunchModalEffect(
            url="https://example.com/info",
            content=None,
            target=LaunchModalEffect.TargetType.DEFAULT_MODAL,
            title="Example Info"
        )
        return [modal_effect.apply()]
Where Modals Open #
A modal opens for the user whose action triggered the handler, in the app they’re using: Canvas or the patient portal.
An application’s on_open, an action button click, and the PATIENT_PORTAL__POST_LOGIN event return the modal in their own response, so it opens right away. Canvas pushes a modal from any other handler, such as a SimpleAPI route, to that user’s browser. The modal opens only if the user has Canvas or the portal open at that moment. If the event has no acting user, the modal doesn’t open.
In the patient portal, use the DEFAULT_MODAL target. The exception is a portal application’s on_open. It can return the PAGE target to show content as the application’s page, as in the patient portal application example. The portal ignores a pushed modal with the PAGE target.
Closing Modals from Applications #
When building applications with the Canvas SDK, you may encounter scenarios where you need to programmatically dismiss modals. This can be particularly useful in automated testing or when creating user flows that require closing modals based on certain conditions.
Here’s a simple example of how to dismiss modals from your applications using JavaScript.
<script>
    let messagePort = null;

    // Listen for the port transfer from the Canvas Application
    window.addEventListener('message', (event) => {
      // Check if this is the INIT_CHANNEL message with a port
      if (event.data?.type === 'INIT_CHANNEL' && event.ports[0]) {

        // Store the port for later use
        messagePort = event.ports[0];
        messagePort.start();
        messagePort.postMessage({ type: 'CLOSE_MODAL' });
      }
    });
</script>
And that’s it! This script establishes a communication channel with the Canvas Application by listening for the INIT_CHANNEL event, capturing the message port, and then sending a CLOSE_MODAL message through that port to close any open modals when the application loads. You can customize the event listener to trigger the modal dismissal based on your specific requirements.
While developers might find odd to be sending a message to themselves, this is the current method supported by the Canvas SDK for dismissing modals, in order to avoid potential security issues with cross-origin messaging and flooding the main application with messages.
This twist on the Holywood Principle ensures that your application remains secure while still providing the functionality needed to manage modals effectively.
Blocking Modals #
Use a blocking modal when the user has to finish a step before moving on, such as signing a consent form. Set dismissible=False:
from canvas_sdk.effects.launch_modal import LaunchModalEffect

modal_effect = LaunchModalEffect(
    url="https://example.com/consent",
    target=LaunchModalEffect.TargetType.DEFAULT_MODAL,
    title="Consent",
    dismissible=False,
)
A blocking modal stays open when the user:
- Presses Escape or selects the backdrop.
- Navigates to another page or selects the browser’s Back button.
On small screens, a blocking modal doesn’t show the back arrow. Signing out of Canvas or the patient portal closes it.
Resizing Modals #
Modal overlays can now be dynamically resized by embedded applications using the MessageChannel API. Applications launching with a DEFAULT_MODAL target can send a RESIZE message to adjust the modal’s width and/or height:
<script>
    let messagePort = null;

    // Listen for the port transfer from the Canvas Application
    window.addEventListener('message', (event) => {
      // Check if this is the INIT_CHANNEL message with a port
      if (event.data?.type === 'INIT_CHANNEL' && event.ports?.[0]) {

        // Store the port for later use
        messagePort = event.ports[0];
        messagePort.start();
        // Example: Resize modal to specific dimensions
        messagePort.postMessage({
          type: 'RESIZE',
          width: 800,  // pixels
          height: 600  // pixels
        });
      }
    });
</script>
This enables embedded applications to optimize their display area based on content requirements, improving the user experience for dynamic or responsive plugin interfaces.
Custom HTML and Django Templates #
Every LaunchModalEffect target, from a modal or side pane to a full page, and every application that opens one, renders its content in one of two ways: load a page in an iframe by setting the effect’s url (see Implementing an Application), or pass HTML in content, for example rendered from a Django template with render_to_string. Either can be a single-page application such as React: serve the page from your plugin and point url at it, or include the app’s scripts in the HTML you pass as content.
To facilitate the use of custom HTML, you can utilize the render_to_string utility from canvas_sdk.templates to render Django templates with a specified context. This allows for dynamic rendering of HTML that can be passed to a LaunchModalEffect or PortalWidget.
from typing import Any

def render_to_string(template_name: str, context: dict[str, Any] | None = None) -> str | None:
    """Load a template and render it with the given context.

    Args:
        template_name (str): The path to the template file, relative to the plugin package.
            If the path starts with a forward slash ("/"), it will be stripped during resolution.
        context (dict[str, Any] | None): A dictionary of variables to pass to the template
            for rendering. Defaults to None, which uses an empty context.

    Returns:
        str: The rendered template as a string.

    Raises:
        FileNotFoundError: If the template file does not exist within the plugin's directory
            or if the resolved path is invalid.
    """
Example Template #
Consider a simple HTML file named templates/custom_content.html:
<!DOCTYPE html>
<html>
  <head>
    <title>{{ title }}</title>
  </head>
  <body>
    <h1>{{ heading }}</h1>
    <p>{{ message }}</p>
  </body>
</html>
This template uses Django template placeholders like {{ title }}, {{ heading }}, and {{ message }} to dynamically render content based on the provided context.
Rendering the Template in Python #
Here’s how you can use the render_to_string utility to render the template and pass the resulting HTML to a LaunchModalEffect or PortalWidget:
from canvas_sdk.effects.launch_modal import LaunchModalEffect
from canvas_sdk.effects.widgets import PortalWidget
from canvas_sdk.templates import render_to_string

class ModalEffectHandler:
    def compute(self):
        # Define the context for the template
        context = {
            "title": "Welcome Modal",
            "heading": "Hello, User!",
            "message": "This is a dynamically rendered modal using Django templates."
        }

        # Render the HTML content using the template and context
        rendered_html = render_to_string("templates/custom_content.html", context)

        # Create a LaunchModalEffect with the rendered content
        modal_effect = LaunchModalEffect(
            content=rendered_html,
            target=LaunchModalEffect.TargetType.DEFAULT_MODAL
        )

        return [modal_effect.apply()]

class PortalWidgetHandler:
    def compute(self):
        # Define the context for the template
        context = {
            "title": "Welcome Modal",
            "heading": "Hello, User!",
            "message": "This is a dynamically rendered modal using Django templates."
        }

        # Render the HTML content using the template and context
        rendered_html = render_to_string("templates/custom_content.html", context)

        # Create a PortalWidget with the rendered content
        portal_widget = PortalWidget(
            content=rendered_html,
            size=PortalWidget.Size.COMPACT,
            priority=25
        )

        return [portal_widget.apply()]
Additional Configuration #
To use URLs or custom scripts within the LaunchModalEffect or PortalWidget, additional security configurations must be specified in the CANVAS_MANIFEST.json file of your plugin.
- Allowing URLs: URLs specified in the url property must be added to the
url_permissionssection of theCANVAS_MANIFEST.jsonin order for the URL to load properly. - Allowing custom scripts: If you need to load scripts from an external source, the URL for the script must be added to the
url_permissionssection of theCANVAS_MANIFEST.jsonand'SCRIPTS'must be in the permissions list. - Requesting microphone access: If the site in your modal or widget needs microphone access,
'MICROPHONE'must be in the URL’s permissions list. - Requesting camera access: If the site in your modal or widget needs camera access,
'CAMERA'must be in the URL’s permissions list. - Requesting clipboard read access: If the site in your modal or widget needs to read from the user’s clipboard,
'CLIPBOARD_READ'must be in the URL’s permissions list. - Requesting clipboard write access: If the site in your modal or widget needs to write to the user’s clipboard,
'CLIPBOARD_WRITE'must be in the URL’s permissions list. - Allowing browser access to cookies from the iframe’s origin: If you want the loaded URL to access cookies for its domain,
'ALLOW_SAME_ORIGIN'must be in the URL’s permissions list. If the URL you’re loading requires authentication, this will prevent your user from having to log in each time the modal is launched.
The URLs must match the format available here.
{
  "sdk_version": "0.1.4",
  "plugin_version": "0.0.1",
  "name": "custom_html",
  "description": "...",
  "url_permissions": [
    {
      "url": "https://example.com/info",
      "permissions": ["ALLOW_SAME_ORIGIN", "MICROPHONE", "CAMERA", "CLIPBOARD_READ", "CLIPBOARD_WRITE"]
    },
    {
      "url": "https://d3js.org/d3.v4.js",
      "permissions": ["SCRIPTS"]
    }
  ]
}
The iframe sandbox and ALLOW_SAME_ORIGIN #
Whether an application’s iframe gets a sandbox attribute depends on the url_permissions entry its URL matches:
- With
ALLOW_SAME_ORIGIN, the iframe is sandboxed asallow-same-origin allow-forms allow-popups allow-scripts. Popups work, sowindow.open(url, '_blank')and popup-based sign-in flows are fine. Navigating the top window from inside the iframe is blocked. - Without a matching entry that grants it, the iframe has no
sandboxattribute, and top-window navigation works.
URLs match by case-insensitive prefix, and every character counts, including the scheme, port, and trailing slash. An entry of https://example.com/ does not match a page at https://example.com. If top-window navigation works in one environment but not another, the URLs are matching url_permissions differently. To navigate away while keeping ALLOW_SAME_ORIGIN, open the page with window.open(url, '_blank'), or remove ALLOW_SAME_ORIGIN if your application doesn’t need it.
 Questions? Create an issue.